How to Watermark Photos: Methods, Tools & Free Options
Updated
When you’re wondering how to watermark photos, you’re usually interested in two things: the steps to do it and the best tools for the job. After all, adding a brand name to a single photo before posting it on social media and applying a logo to hundreds of images are two entirely different tasks that require different approaches. The first task is pretty easy so, a simple app should be enough. The second task, though, will probably require a more advanced app with a versatile toolkit and batch processing.
Fortunately, there are many ways to add a watermark to a photo. You can use professional photo editors, specialized desktop software, web-based or mobile apps – some of which are completely free.
In this guide, we’ll take a look at various ways to add watermarks, explore when to use each one, and share a few handy tools that can help you get the job done.
How to Watermark Photos Using a Professional Photo Editor
If you are a professional photographer or plan to make a living from photography, you probably already use a professional photo editor. And as you may know, the majority of photographers choose Adobe Lightroom or Lightroom Classic for processing large volumes of RAW files, color grading, adjusting exposure and contrast, etc.
Unlike Photoshop, which is geared more toward detailed editing of one image at a time, both versions of Lightroom are well-suited for working with batches of photos. In particular, they allow you to add the same watermark to all selected shots at once.
How to add a watermark to photos in Adobe Lightroom
In Adobe Lightroom, a watermark is added during export. Here’s how to do it:
- Select all the photos that need to be watermarked.
- Go to File > Export.
- Enable the Include Watermark option.
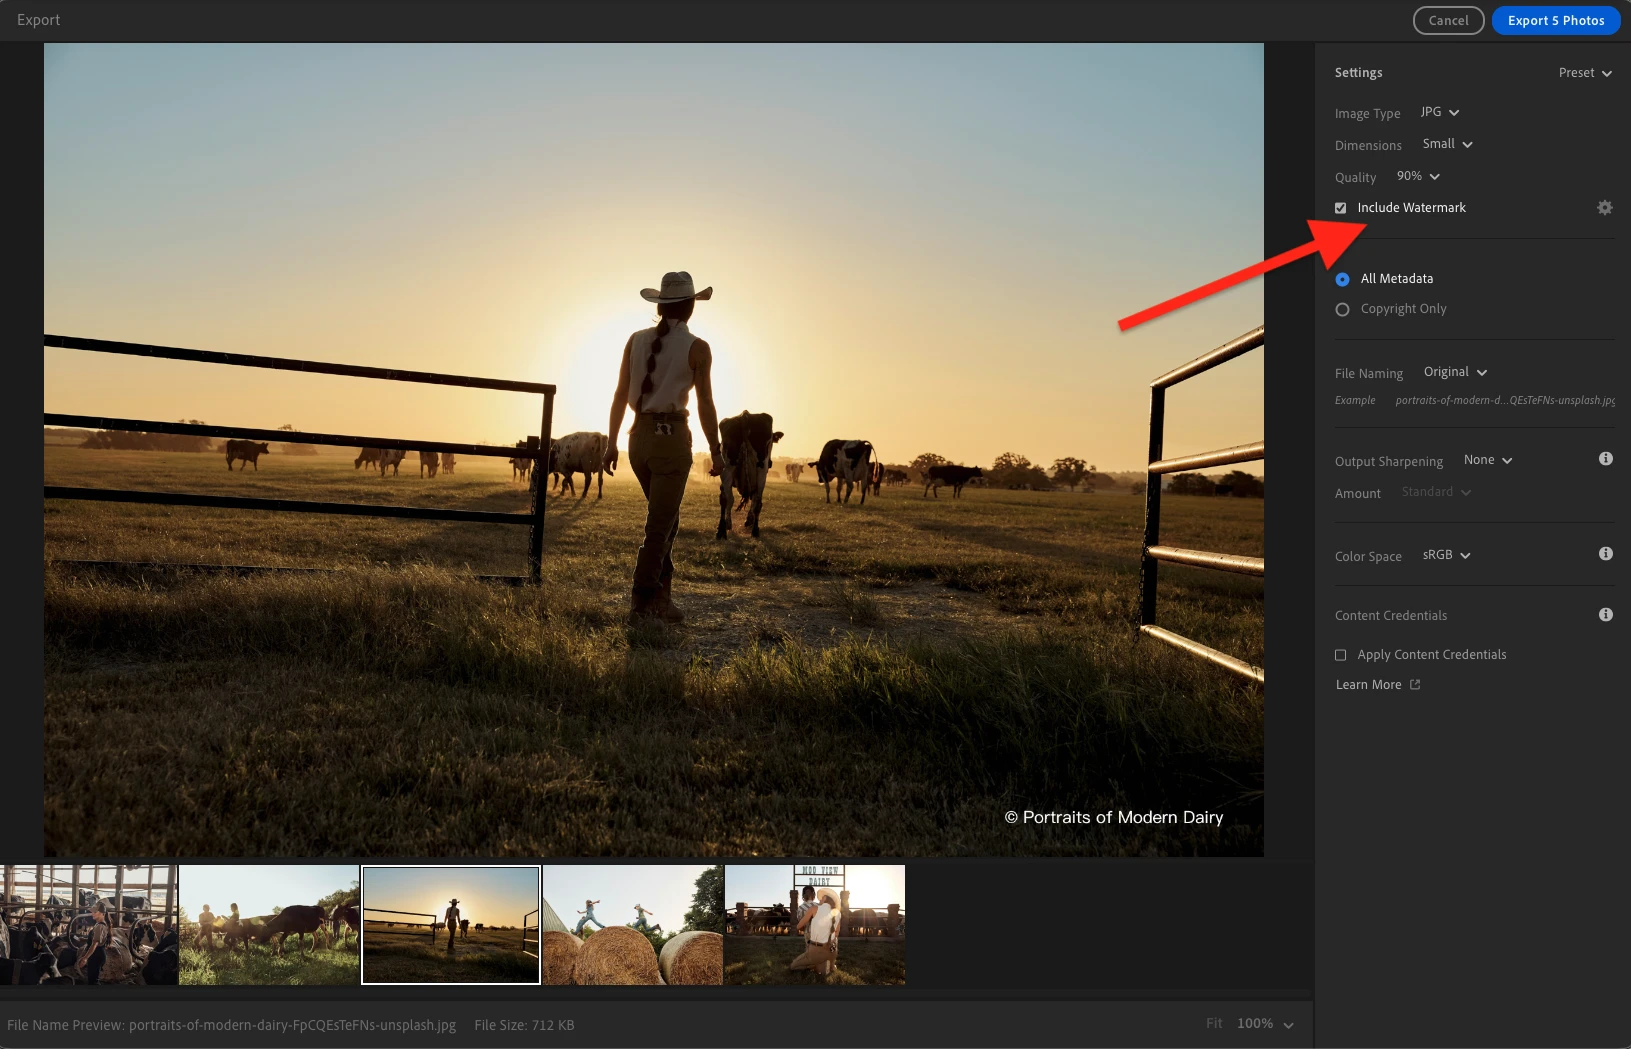
- If you’re creating a watermark for the first time, click the gear icon to open its settings.
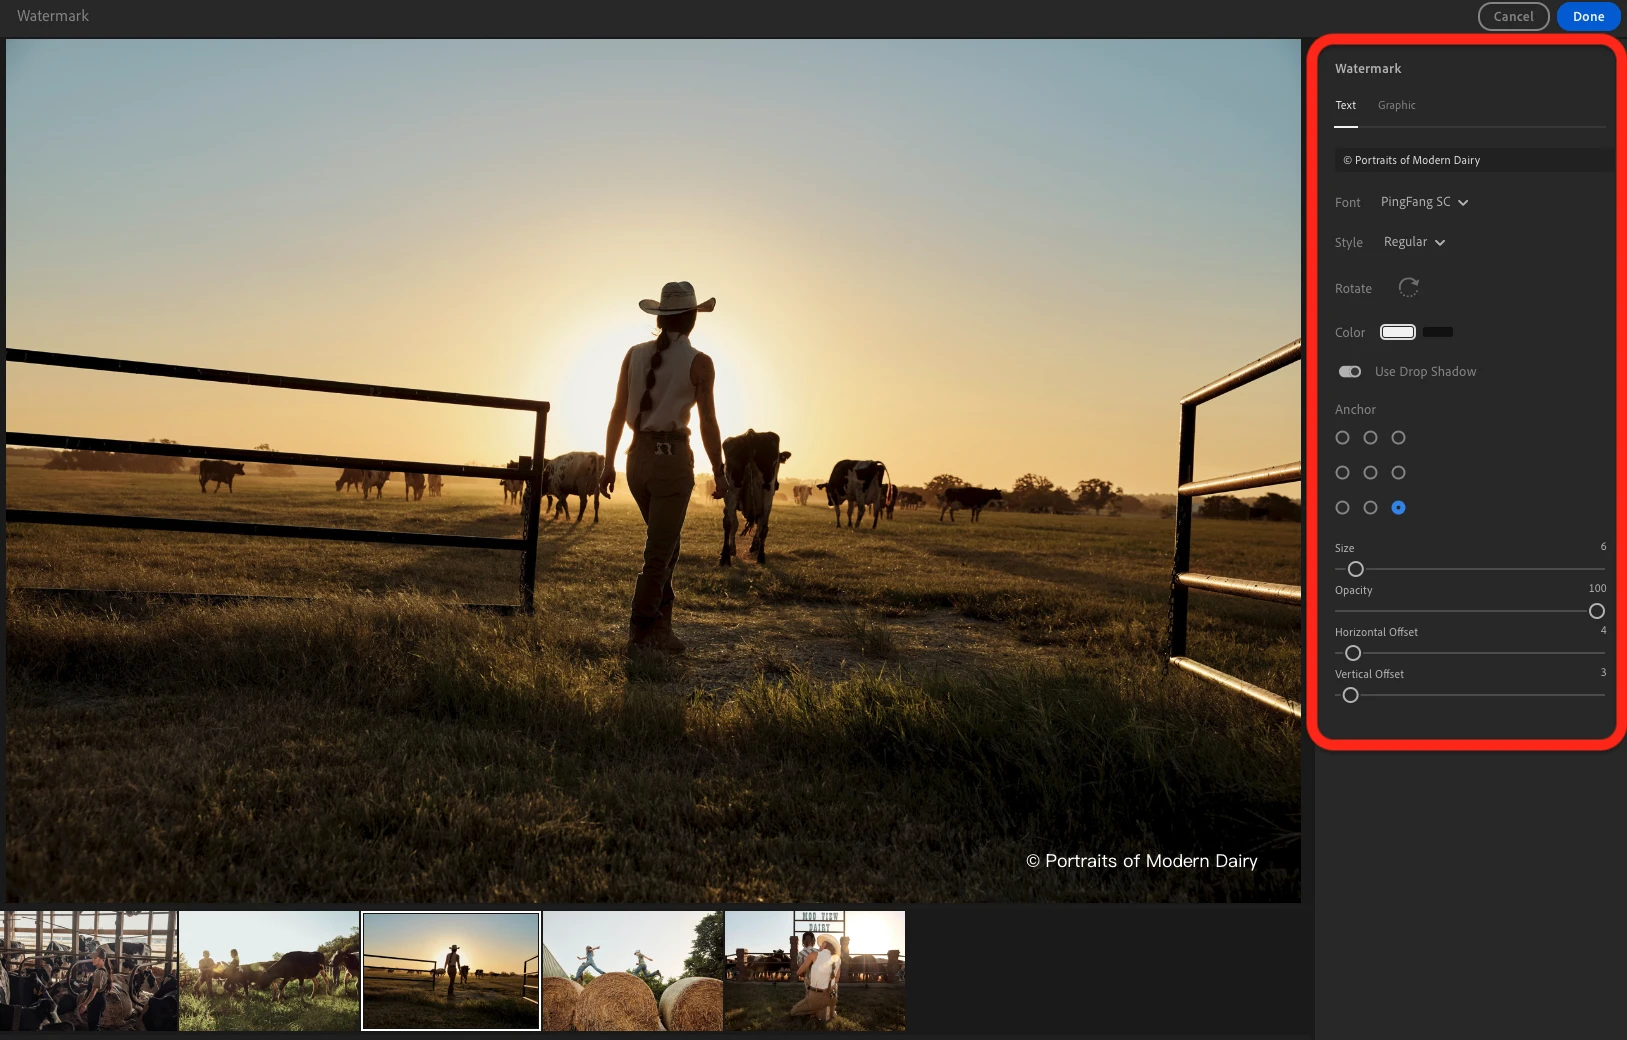
- Click Done to save the watermark settings, and then click Export to save the photos to your device.
If you are satisfied with the selected settings and would like to use them again, simply choose Export with Previous the next time you export. Your photos will be saved using the same settings, including the watermark.
How to add a watermark to photos in Lightroom Classic
In Lightroom Classic, a watermark is also added when you export images. However, unlike in Adobe Lightroom, you can create a watermark template, which is called a watermarking preset, in advance.
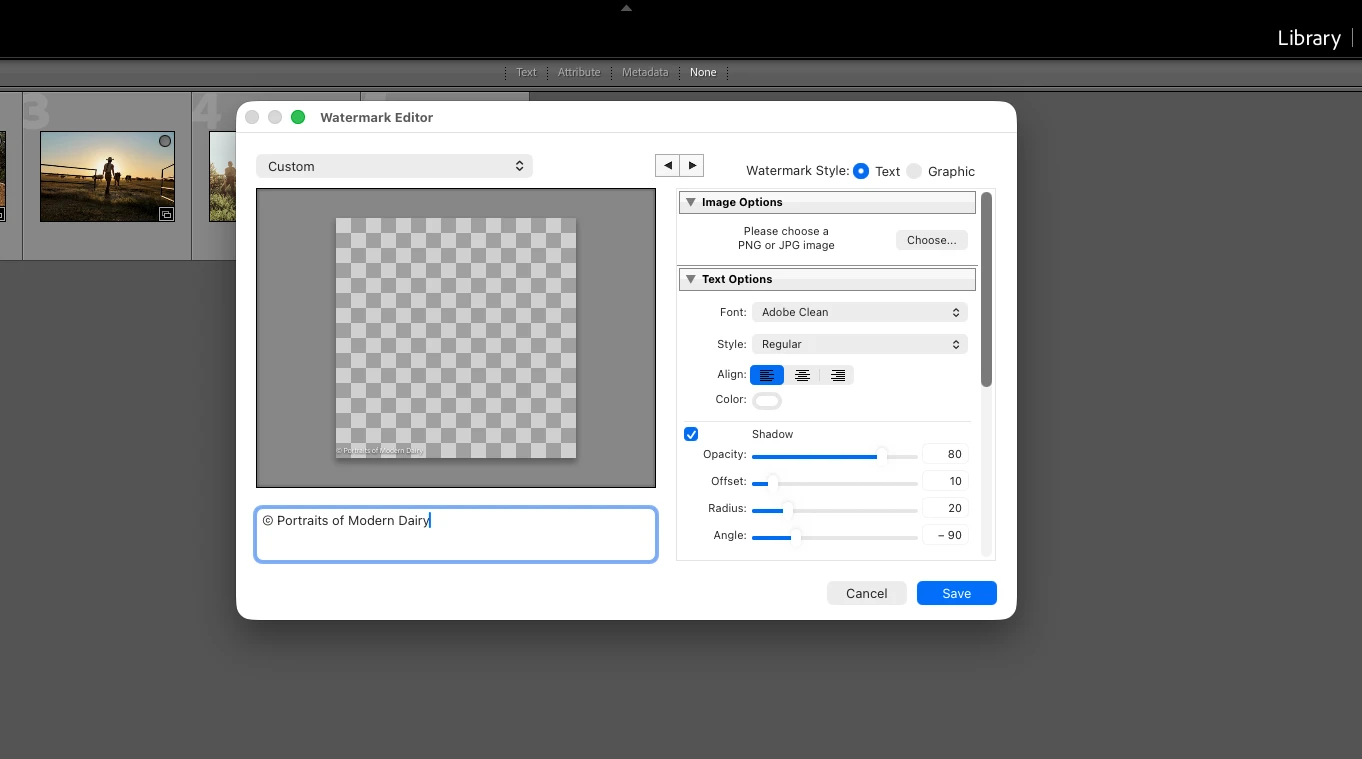
To do this, go to the Lightroom Classic menu and select Edit Watermarks. Create a watermark by entering your text or uploading your logo, then adjust its placement and make other necessary edits. Finally, save your watermark as a preset – remember to give it a suitable name.
When you’re ready to export your photos, scroll down to the Watermarking section in the export settings window, enable this option, and select the template you created.
Watermark customization options
The key advantage of adding watermarks in Lightroom is that the same settings are applied to all photos in a selected batch. Your watermark will look identical and have the same size and position on every image.
Your watermark can be text-based. By default, a copyright symbol is added to it, though you can remove it if needed. A wide range of fonts and standard styles is available for formatting the text.
Another option is to use your own logo. To do this, you need to upload an image in PNG or JPG format. But there’s something you must be aware of – editing capabilities for logos are quite limited in Lightroom. For instance, you cannot remove its background or change its color. Therefore, you need to make all the necessary adjustments beforehand.
Luckily, Lightroom does allow you to pick a color or add a shadow to your text-based watermark. Also, whether you use text or a logo as your watermark, you can adjust the size, position, opacity, and angle.
Who this method is for
Adding watermarks in a professional photo editor like Lightroom will be especially practical for those who:
- Already use Lightroom on a regular basis and pay for a monthly or annual subscription. This way, you won’t have to install any additional software to add watermarks.
- Want to maintain a consistent look and use the same watermark on all photos.
- Prefer simple watermarks that consist of a single element – a string of text or a logo – placed in a specific spot on every image in the batch.
Watermark Photos Using Desktop Watermarking Software
If you don’t want to deal with professional photo editors, specialized desktop software for adding watermarks can be a great alternative. It typically features a simpler, more intuitive interface, as its functionality is focused on a single primary task. Such desktop apps are easy to install, can operate without a constant internet connection and process large batches of photos – some even allow you to import entire folders in one go.
There’s another advantage – desktop watermarking apps tend to be more affordable. For example, a lifetime license for a specialized app might cost around $40, whereas a monthly subscription to Lightroom is about $12.
In general, it’s quite easy to add watermarks using specialized desktop software. You upload your photos, choose the type of watermark – text or a logo – edit it, and save the finished images.
At the same time, specialized watermarking apps often offer far more options for creating and customizing watermarks than it might seem at first glance.
To have a better understanding of these editing capabilities, let’s look at the watermarking process using the Visual Watermark app as an example.
The first thing that catches your eye is that you can choose from three types of watermarks instead of just two: Add Text, Add Logo, and Add Group. The latter offers ready-made templates that combine icons and text elements with various styling options. This allows you to create more complex and unique watermarks – so, you won’t have to settle for a simple string of text that consists of your first and last name.
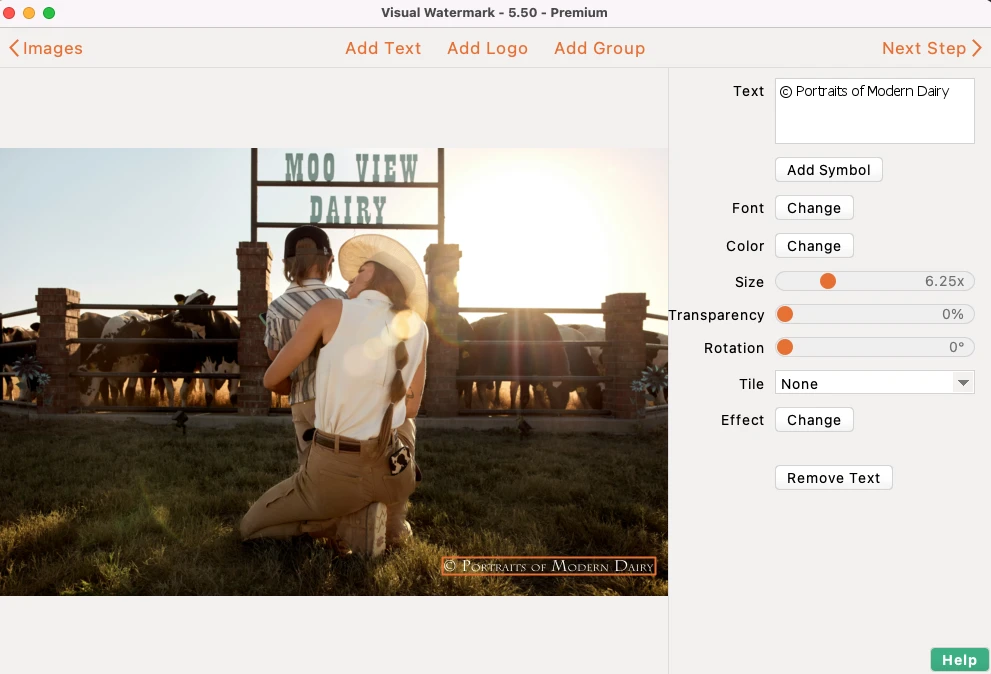
There are also more options available for editing logos. For instance, you can create a logo from scratch using icons from the built-in gallery, as well as upload your own logo and remove its background within the app or change its color.
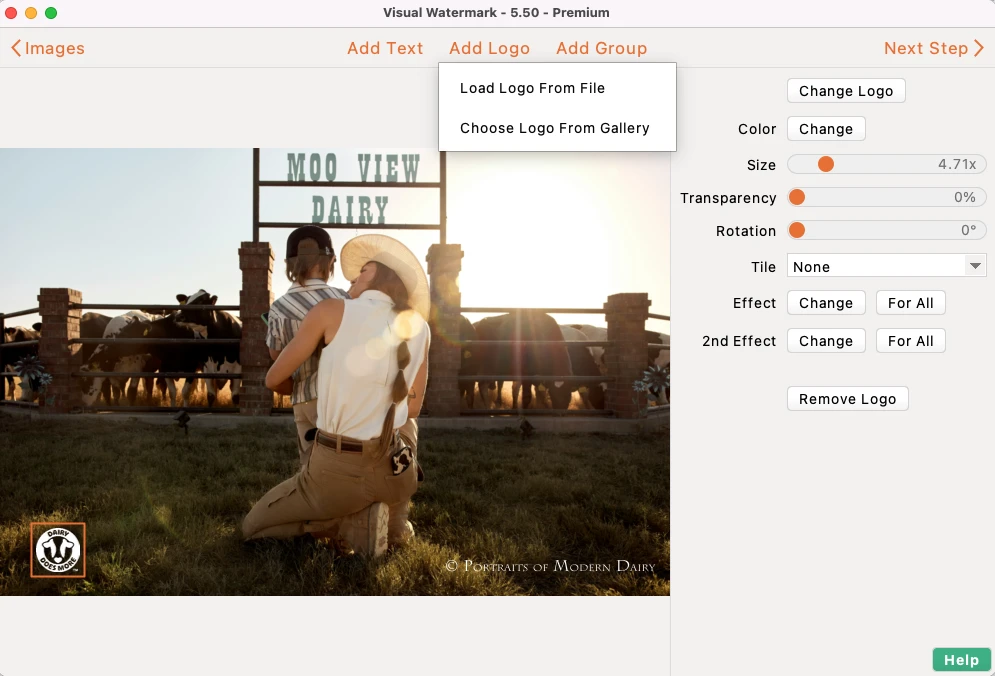
You don’t have to limit yourself to just one type of watermark, either. You can add multiple elements to a photo – for example, both a logo and a text-based watermark.
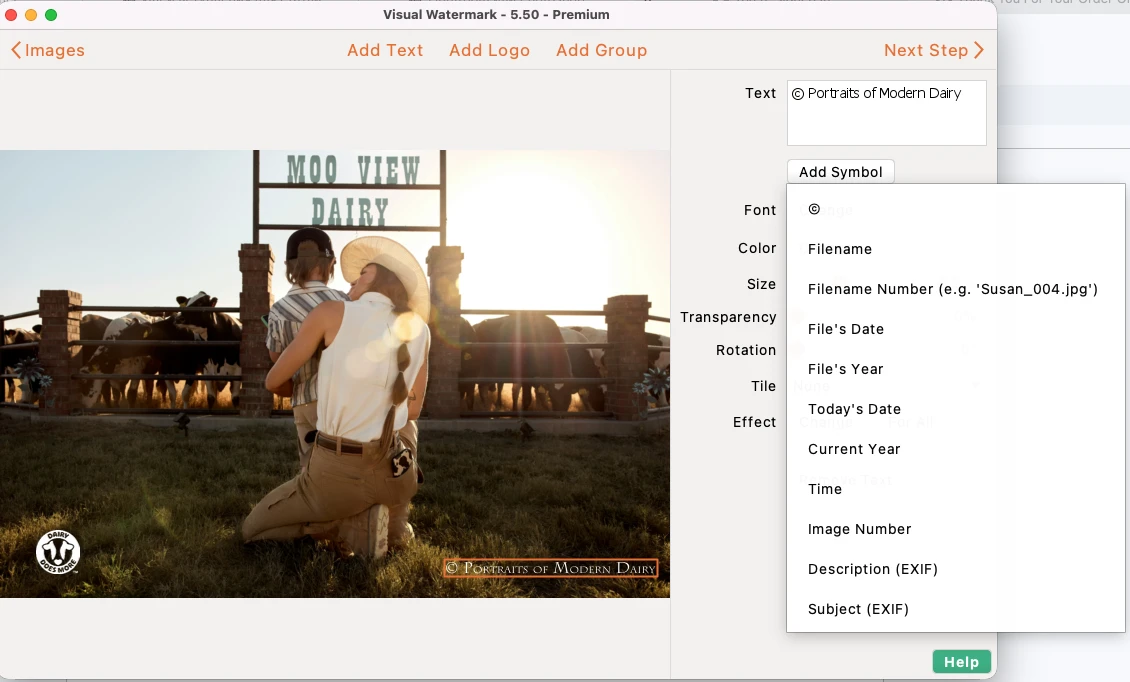
Another handy feature is the ability to add a file number, date, filename, or some other information as a watermark. Thanks to it, you can use watermarks not only for indicating authorship but also for organizing your photos.
A major difference from Lightroom is the Tile feature, which allows you to cover an entire photo with repeating watermarks. Moreover, Visual Watermark offers a wider range of effects, e.g., shadow or embossing, for styling text and logos.
Finally, you’ll be happy to know that there’s an option to preview your watermarks on images before exporting. In the preview section, you can check how the watermark looks on each photo and, if necessary, make individual adjustments to size and position.

Who this method is for
Specialized desktop software for adding watermarks will be particularly useful for those who:
- Are looking for a more affordable alternative to professional photo editors and don’t want to pay for a pricey subscription just to add watermarks.
- Regularly work with large batches of photos and want to apply watermarks to a lot of images in one go.
- Require flexibility and a versatile toolkit, as well as want to combine text, logos, and other graphic elements.
- Want to use repeating watermarks that cover an entire photo instead of placing a single watermark in one particular spot.
Watermark Photos Using an Online Watermarking Tool
Another convenient way to add some text or a logo to a large number of images simultaneously is to use web-based apps for adding watermarks. However, they may fall short of desktop apps when it comes to the number of images that can be uploaded. For instance, a desktop app might easily handle a batch of up to 50,000 photos, whereas you’ll be able to process only 2,000 images using a web-based app. That said, the actual processing speed may be the same in both cases.
When choosing a web-based app, you should take into consideration where exactly your photos are going to be processed – directly in your browser or on a remote server. It is better to opt for the former, as it keeps your images on your own device instead of sending them to a third party. Hence, your files will be safe and secure, and the processing will be much quicker.
The main advantage of online tools is that they can be used from nearly any device with a web browser and an internet connection. Furthermore, some web-based apps – e.g., Watermarkly – allow you to save your editing history and synchronize watermark templates across different devices. Thanks to this, you can begin a project on one computer and continue it on another, without having to recreate your watermark from scratch.
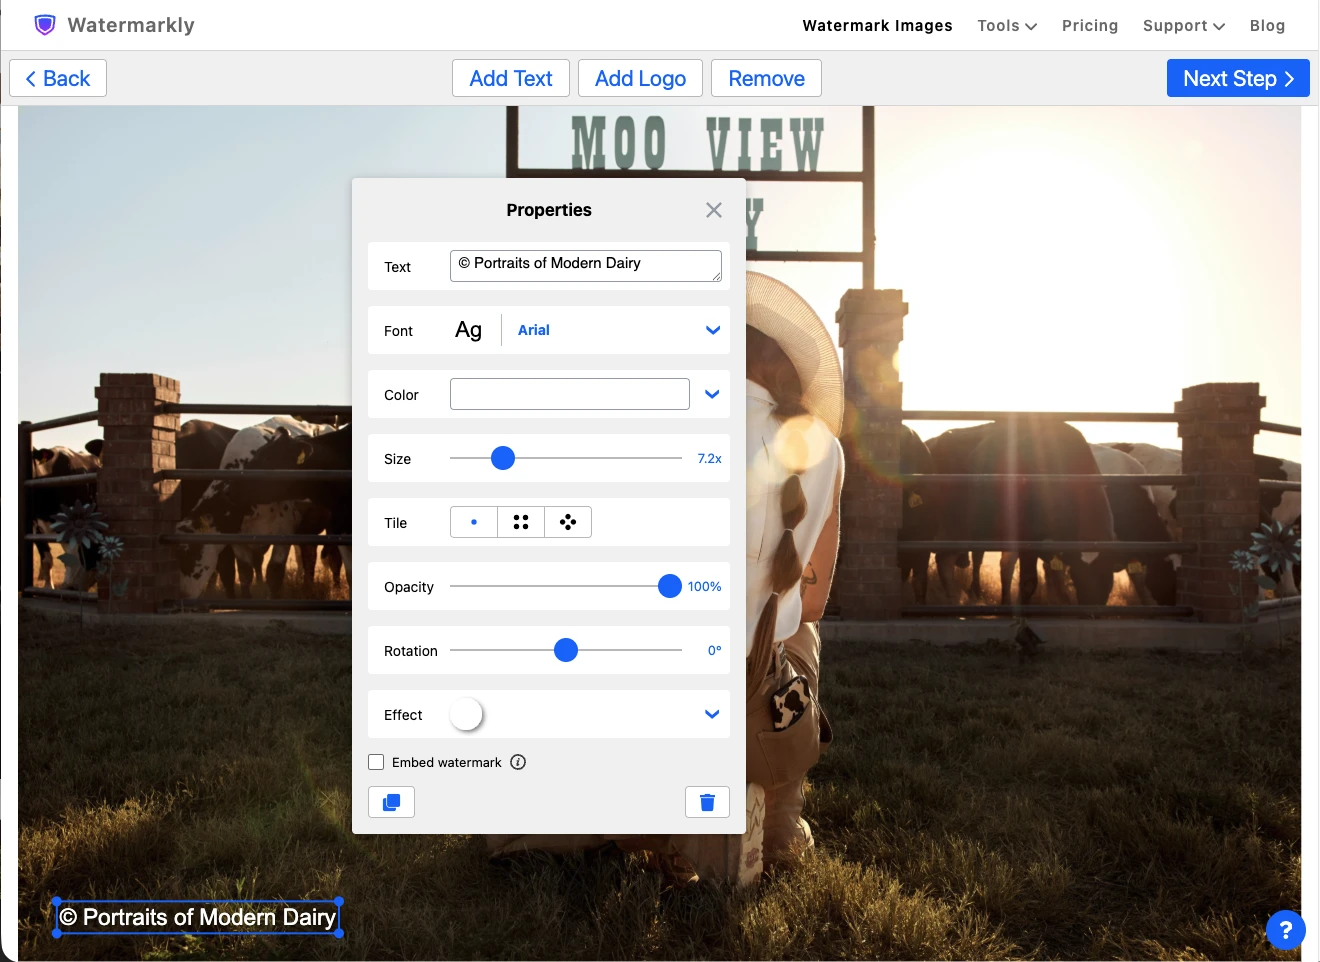
In terms of watermarking capabilities, web-based apps are very similar to specialized desktop software. You can upload your own logo, tile your watermark, apply various styles and effects, as well as adjust opacity and other settings. At the same time, the interface tends to be uncomplicated and user-friendly, even for those who have no prior experience in image editing.
Additional export settings, found in some web-based apps, are worth a closer look. They make it possible to automate the processing of large batches and reduce the need for manual adjustments.
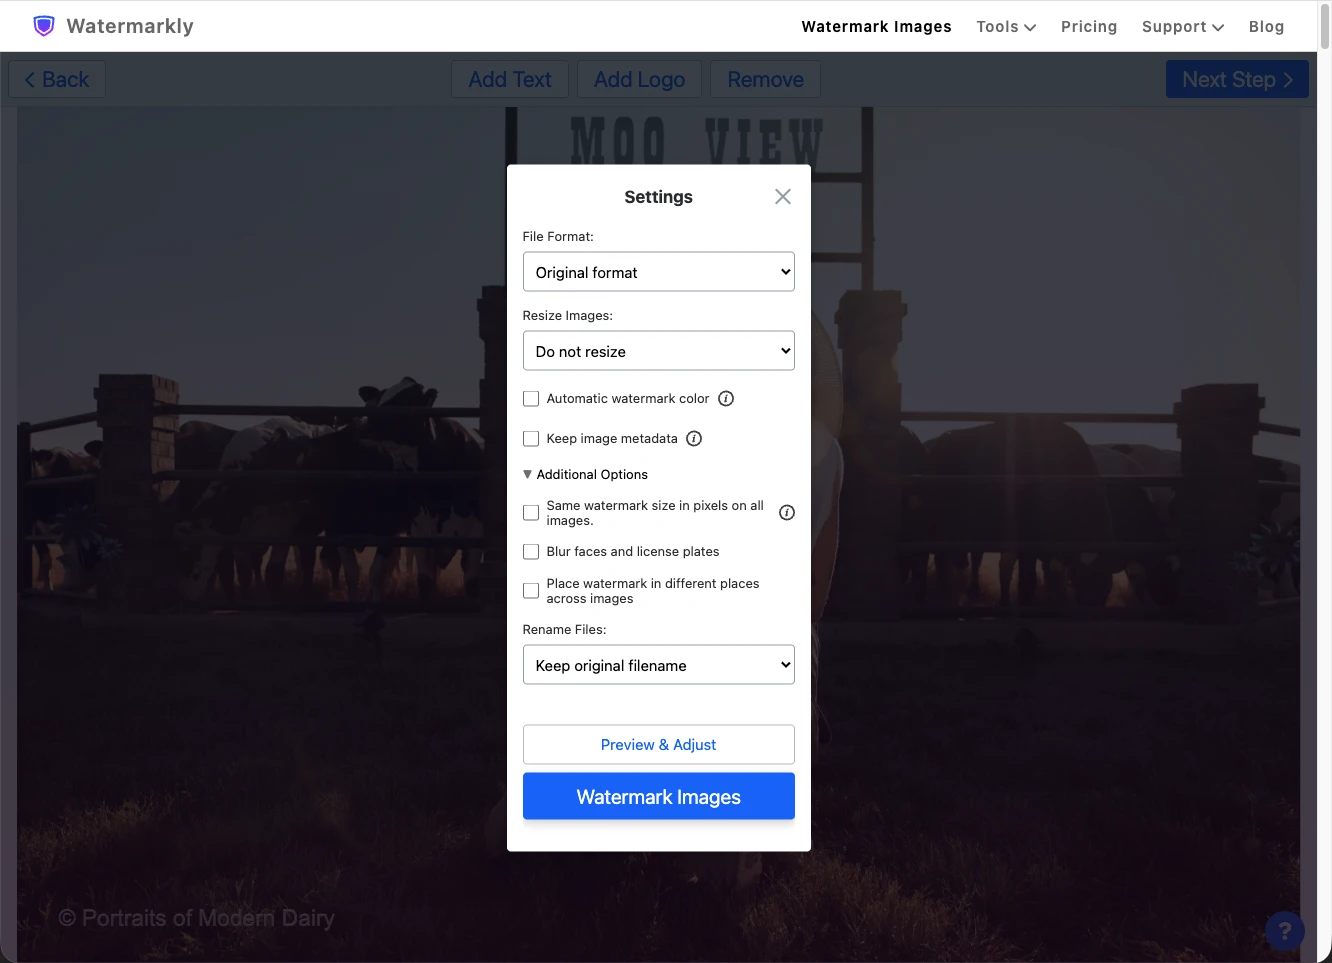
Additional export settings often include:
- Automatic color adjustment. This feature automatically adapts the color of your watermark to keep it high-contrast and clearly visible against various backgrounds.
- Automatic size adjustment. It adapts the size of your watermark to photos with different pixel dimensions and orientations, ensuring a consistent look.
- Automatic positioning. This feature repositions your watermark depending on the image size and orientation. So, you won’t have to adjust its placement for every single photo manually.
Who this method is for
Online tools for adding watermarks will be especially convenient for those who:
- Want to be able to access the tool at any time, regardless of which device is at hand, and don’t want to install any additional software.
- Are looking for extensive capabilities to design and edit watermarks, including various text styles, color adjustment, shadows, embossing, and tiled watermarks.
- Work with large batches of photos and want to automate the process as much as possible, using additional export settings that may not be available in standard photo editing software.
How to Watermark Photos on Your Phone
Mobile apps for adding watermarks can be broadly divided into two categories: standalone apps available exclusively on smartphones, and mobile versions of web-based or desktop apps.
The second category often proves to be more convenient, as it allows you to work with watermarks across different devices. Such apps may feature similar interfaces and functionality, a shared editing history, and synchronization of saved templates. This means you won’t have to recreate a watermark when switching from a computer to a smartphone. More to that, if, for some reason, the app becomes unavailable on one device, you’ll be able to use it on another.
Mobile apps have one more advantage – you can gauge their quality in advance through user reviews. On the App Store and Google Play, you can view the average rating, the overall number of reviews, and comments from people who have already used the app. All of that can help you determine if an app is worth your time before you even install it.
It’s important to note that mobile apps can differ significantly in terms of their interface and functionality. Some offer only a basic toolkit for adding text or a logo, while others provide a more versatile set of tools and features for designing and editing watermarks.
Who this method is for
Adding watermarks on a smartphone will be particularly convenient for those who:
- Are used to taking photos on a smartphone and prefer to do all image editing on a single device, without transferring files to a computer.
- Are active on social media and want to quickly add watermarks to photos before posting them.
How to Watermark Photos for Free
It tends to be pretty easy to add a watermark to a handful of photos for free. However, processing a large number of images in one go is a different story, as in many apps, batch watermarking is usually a feature that you must pay for.
If you don’t plan to purchase a subscription or a license, you might have to process your photos one by one: upload an image, add a watermark, save the result, and only then move on to the next shot.
The good news is that all the tools mentioned in this guide offer the option to try out their features for free, albeit with certain limitations:
- Lightroom (a professional photo editor) offers a 7-day free trial period.
- Visual Watermark (a desktop app) allows you to add watermarks for free, but the app’s brand watermark will appear on the processed photos, too.
- Watermarkly (a web-based app) allows you to upload multiple photos at once and add a watermark to them, but you can only download one image for free.
- Mobile apps often limit the number of photos that can be processed for free per day (for example, up to 10 images) and may also display ads.
Overall, free versions and trial periods are a good way to get to know an app, test its features, and see how a watermark will look on finished images. However, they are unsuitable for processing large batches of images regularly due to limitations on the number of photos or the addition of brand watermarks.
Conclusion
The method you choose for adding a watermark depends primarily on the number of photos you need to process, the device you are using, and the specific customization capabilities you need.
If you already use Lightroom, the most practical approach is to add a watermark directly within the editor. If you need to process large batches of photos or want more complex watermark designs, specialized desktop software is a better choice. Web-based apps are ideal for cross-device workflows, while mobile apps work best for quick, on-the-go editing. On top of all that, keep in mind that free versions are great for exploring the capabilities of these tools, but their limited functionality might not be enough for ongoing use.